In the winter of 2023, I received a Research and Exploration grant from the Conseil des Arts et des Lettres du Québec (CALQ) to build a speaker array for long-distance, outdoor interactive sound installations. This idea had been on my mind for a while–in 2020 I was hired by the National Film Board as a consultant to help one of their artists create a proposal for a sound-based installation in the Prairies of Saskatchewan. Sadly, that project got shelved due to the pandemic, but the idea had been planted in my mind so I decided to pursue it independently.
On this page, I will detail my process in creating a working prototype of a speaker system that can control audio playback over long distances based on user input and/or sensor data, and provide an assessment of the components I used.
Project Architecture
When I first set out to make a wirelessly controlled speaker array, I wasn’t sure exactly how it would work, what parts it would take, or exactly what to do with it. I was imagining something that would allow sound-based artists to create responsive, dynamic installations in a large outdoor context. My first step was to visualise how information (and/or sound) could flow:
- OPTION 1: One-Way flow from a central computer to discrete speakers.
- Wired communications would be subject to the logistical nightmare of installing cabling and signal loss across long runs.
- Short-range FM transmitters are a good option, but I’ve already done that (see my sound.garden.scape projects), and there’s limited capacity for each speaker within the array to send/receive other data like using a proximity sensor to trigger playback, or have local information control any part of the audio being played back on site as any changes to the audio at leach speaker location would be determined by/from the CPU.
- OPTION 2: Two-way communication between CPU and speaker.
- This option seems like a good one. Having a CPU allows for more audio processing power and the ability to use sensor data to create generative audio, and perform audio synthesis in real time.
- Requires a CPU on site, which isn’t great for remote or long-term installations. Having AC power isn’t always an option (without a noisy generator or a lot of battery power).
- This setup still requires some way of sending the audio from the CPU to each speaker (so, probably short-range FM), but now with the added issue of sending data from each speaker to the CPU (and possibly back again). It was at this point in my research that I started looking into LoRa devices.
- OPTION 3: Local Access Networked communication among all speakers and a remote control unit.
- A slight compromise. Using LoRa transceivers allows for two-way communication among all speaker units so any data collected locally can be shared across the network.
- Downside: it requires that each unit have its own local playback device which puts limitations on the variety of audio possible. The only audio control parameters available are track selection, amplitude (volume) changes, and sample rate variation (speeding up or slowing down preloaded tracks). No real time synthesis or signal processing possible (beyond layering multiple tracks).
- Upside: advanced flexibility in how data can be collected, processed and shared. Individual units could be relatively self-sufficient (wouldn’t require cabling), and there is the potential for local data from each unit to be shared across the network.
I decided to explore the local access network option, as it presented me with a new challenge, and allowed for control over the sounds being played back in a novel way–honestly, having local playback control for each node/unit was appealing. If I wanted to broadcast sound to remote speaker locations or perform real-time signal processing or playback modifications, a series of short range FM transmitters would work perfectly well for this. Having already explored the potential of short-range FM transmitters with my sound.garden.scape installations I wanted to try something new.
So, I had to learn how a LoRa network functions, and how it could be used to control audio. I’m not going to go into detail on what LoRa is, or how it works. You can find out more info on that here or here. For me, the key decision was in what data the radios would send or receive, and how they would share this information. I decided to use an Arduino-based build environment, largely because I’ve been working with Arduinos since the Leonardo days, and I dig the modular building aspect–allowing you to control or modify each peripheral without having to commit to a particular hat or shield.
Once I made that decision, the next step was to envision the component parts that would make up each playback unit in the array. I wanted this array to be flexible based on the individual needs of a specific project, so I decided to start with a relatively simple setup using as few components as possible. I also wanted to keep scalability in mind, making sure that there was no set limit on the max or minimum number of playback units within the array. Each unit is made up of a LoRa radio module, a microcontroller running the Arduino programming environment, a WavTrigger audio management board, environmental sensors, a 5v rechargeable battery pack, and a self-powered speaker/amplifier. Each unit is protected from the elements by a waterproof case.
Designing the Speaker Array
After digging around for a while on the web, I decided to use the Robertsonics WavTrigger as the audio management board. The high audio bit/depth rates, ability to manage thousands of audio files, and onboard amplifier with ⅛” output jack combined with a fairly robust Arduino library made this a pretty attractive choice.
The next component I wanted to test out was the LoRa module itself. Since this was a Research and Exploration project, I decided to try out a few different options. After settling on using the 433MHz band (which purportedly has a longer range), I bought a few boards that featured an integrated RA-02 LoRa Module, the Wemos/TTGO Uno (which I believe is now discontinued), and a few Wemos ESP32-based microcontrollers that featured an integrated LCD screen (which really came in handy during the initial testing phases). I also picked up a few Arduino Unos and the standalone RA-02 modules.

With audio management sorted, and a few options to try out for LoRa transmission and serial communication, the next piece of the project was finding the right speakers. Because the goal of this prototype is to be deployed for longer durations in outdoor situations, these speakers needed to balance output power and sound quality with durability, weight, and battery life.
My first thought was to try using portable bluetooth speakers–which are great from a weatherproofing and portability perspective, but I didn’t want to have to attach a bluetooth transmitter to the WavTrigger, and they’re actually pretty pricey if you want something that can output audio at higher levels or across longer distances. Next I started looking at portable guitar amps, but these little 9v units don’t pack much punch, and many come with a digital tone emulator to mimic a classic full-size amp. One of my goals with this project is to be able to create sound and music in the studio and then test it out in the woods, so I wasn’t looking to add timbral colouring or other audio effects.
In the end, I decided to test out three different portable amplifiers representing a nice range of options from inexpensive consumer electronics to pro audio solutions: a Joyo 10w guitar amp, the 15w Traynor Travelmate battery-powered amp, and the Mackie FreePlay Live 150w portable PA. I’ll provide a brief assessment of each speaker a little later in this post.
The final component I needed to source was a power supply. This is one of the areas where I made a bit or an error. By this point in the project, I was pretty deep into sourcing materials from electronics suppliers, and got down the rabbit hole of LiPo rechargeable batteries. These are really handy batteries that integrate well into Arduino projects and are pretty stable long-term (although there are lots of helpful hints on how to keep them operating at their best). However, they require a battery management system in order to provide the 5v of power required by the Arduinos.
So, I found the AdaFruit PowerBoost 500 board. It comes on an Arduino Uno shield, so it can plug directly onto an Arduino, without requiring any jumpers–great deal, right!? Unfortunately, I found these devices to be extremely unreliable, and had five (yes, that’s right, FIVE) of the eight units I purchased stop working while I was still bench testing the prototype. Suffice to say, I do not recommend this product, and for all future iterations of this project I’ll be using portable USB charger blocks which are cheaper, have a longer battery life, and are much more reliable.
Assembling Units
Because this project was about research and exploration, I decided to try out three different LoRa radio modules, multiple different microcontroller options, and three different types of battery-powered speakers. This range of equipment informed the overall development of the array, and has given me incredible insight into the potential for future exploration.
In order to develop the final prototype, I first needed to test out individual functions. I began by testing the on-board serial communication between the WavTrigger audio management/playback board and the Arduino microcontrollers.
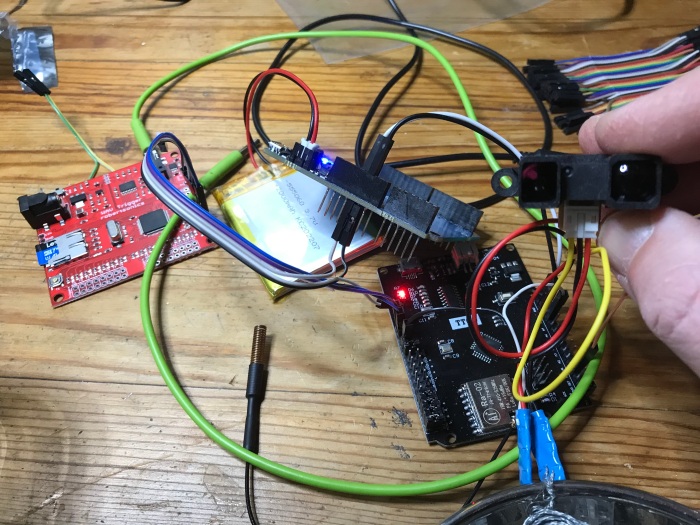
Once I had these two devices communicating, I integrated an infrared proximity sensor, which created the ability to start or stop audio based on relative distance from the sensor. The next module I built played three different pieces of audio depending on how near or far away I stood from the sensor. After that, I built a module to test the ability of the LoRa radios to receive a data packet, modify it, and then send the modified packet, providing proof of concept for the networked communication I was hoping to develop.
The next module tested the keypad used for entering command codes, and broadcast these codes wirelessly using a LoRa transmitter. The final step was the LoRa receiver, which read the command code message, and sent control data via serial communication to the WavTrigger playback board.

It seems that both the LoRa radio modules and the software serial libraries need to use the same pin (pin 9 on an Uno) in order to function. If you’re interested in learning more about how this works, let me know in the comments below. The real downside of this communication backlog is that it limits the functionality of the WavTrigger library to one-way communication meaning it is possible to send commands to the WavTrigger (start, stop, change amplitude/sample rate, etc), but the WavTrigger can’t send information back to the Arduino (like whether or not a particular track has stopped playing). This makes it impossible to have a hold function (making sure the playback unit doesn’t start a new track until the previous one has finished playing) without building a delay into the code itself which is clunky and not useful if your tracks are of different lengths.
Developing The Code
For this project, I enlisted the help of my long-time collaborator, Matt Griffin. Over the years we’ve built a number of interfaces together, including iFly Dubai, and 168 Hours. Matt is a great coder, and we have a solid working relationship which was really helpful for this project as trying to figure out how these units would talk to one another was a tough nut to crack. After a few conversations, we decided to use a six digit numerical command code as the data packet that would be broadcast to all receivers in the array. This six digit code was broken down into a 2 digit function value, a 2 digit receiver ID number, and a 2 digit variable value.

The next step was to build code in the Arduino IDE to check for incoming LoRa data packets every 50ms. Once a packet was received, the code would parse the packet, move on to the necessary command function, check to see if the receiver ID matched, then execute the function (most of which were sourced from the Robertsonics WavTrigger Arduino library), and then use the variable value to identify track number, amplitude level, etc..
The command functions we built as part of this prototype included:
- Stop All Tracks on All Units
- Play Tracks in Sequence
- Fade In Track xx with Preset Delay
- Play Track xx
- Use IR Sensor to Trigger Track xx
- Change Volume
- Cue Track xx
- Start Playback on Cued Track
- Set IR Distance Variable
- Enable Loop Function for Track xx
- Disable Loop Function for Track xx
- Stop Track on Individual Receiver
The user-end functionality of the array is quite simple. Using the remote control keypad, users can punch in a 6-digit code that identifies the operation (start/stop playback, change volume, loop track), intended recipient of the operation (the current version of the code can support up to 99 receiver units), and function-specific data (the track number to play, new volume value, sensor data). The only real drawback to this system is that it requires a cheat sheet with all the codes and track names on it. After regular use, it is possible to memorize common codes, but the user interface is a little clunky. In future iterations, these codes could also trigger sequenced events where the playback units would send follow-up messages to one another, or share sensor data across the network to create environmentally responsive functions.
Aside from some of the hardware issues I mentioned above (the Arduino AltSoftSerial library and LoRa modules requiring the same pin for proper functionality), this code works very well. The limitations I found were an inability to regularly query a sensor value while simultaneously checking for incoming LoRa data packets, and a discouraging amount of dropped messages when trying to get each LoRa unit to switch between receiving data packets, modifying them, and sending them back out to the array. However, I feel that these issues have more to do with my code than with the hardware, and can easily be solved in the next iteration of the project.
Additionally, I found that over long periods of activity, the radios tend to drift a little. This means that they tend to lose contact with one another and require rebooting in order to communicate with the rest of the network. In the next iteration, I plan on building in a digital reset switch that will reboot the LoRa module if they go too long without receiving a message–but this function really depends on the needs of the (future) project.
Summary and Evaluation
Overall, I am extremely pleased with how well this initial prototype functions. It took a fair bit of work to get here, but it is really easy to deploy this array in the field–the receiver/playback units are light, portable, and reasonably robust (I mean, we’re talking about Arduinos here, so they still need to be handled with moderate care). The command code structure works very well for simple applications like starting or stopping audio, changing playback amplitude, turning on or off a loop track function, and changing sample rate (although I haven’t built this feature yet). With these functions alone, I feel the array is ready for application in a site-specific installation.

That said, I have discovered a few drawbacks within these units as they are currently assembled. A single Arduino Uno is not able to run the LoRa module alongside bidirectional serial communication with the WavTrigger. I’m currently debating upgrading to the Arduino Mega (which has multiple serial ports), or adding a second Uno to the mix where one microcontroller handles LoRa, and the other handles communication with the WavTrigger. While clunky, this adoption would allow me to reboot the LoRa modules if they start drifting without interrupting audio playback. While the ESP32-based microcontrollers are handy (having the LCD screen honestly saved this project during the debugging process), but I found I had a lot of issues in trying to use the WavTrigger library with these boards, and I was not able to use them to control audio playback. However, I would definitely use them as a LoRa transceiver module which would then be paired with another Arduino to control the WavTrigger.
As I mentioned earlier, the Adafruit PowerBoost 500 battery management board was really more of a PowerBust. These shields are unreliable and customer support at Adafruit really sucks. Next time I’ll remind myself that Arduinos can run off USB power, and portable power banks are cheap.
Now a big part of how well an audio playback array will work out in the field has to do with what gear you’re using to send the sound out into the world. So I’d like to take a moment to talk about the three different battery powered amplifiers I used in testing the array.

As I mentioned above, I chose to use the Joyo 10w portable guitar amplifier, the Traynor Travelmate 15w amp, and the Mackie FreePlay Live 150w portable PA. One of the deciding factors in choosing an amplifier for this project was whether or not the amp featured a stereo aux in (either RCA or ⅛” TRS). This was important because The WavTriggers arrive with an ⅛” output jack, and I wanted to keep the audio cabling as simple as possible.
The Joyo is a great option for smaller spaces or a more intimate listening experience–more of a key sound application rather than long-range broadcast, as it doesn’t get very loud without distorting audio. This lack of ‘punch’ is easy enough to overlook when you consider just how light, small and convenient this amp is to deploy in the field. Powered By 6 AA batteries, this speaker only weighs a couple pounds, and comes with screws on the side (for a guitar/shoulder strap) that make installing the speaker at ear height very easy. Make no mistakes, these are cheap speakers, but they work well enough, and if you’re planning on having a lot of playback units these would be my top choice (just make sure you buy a lot of rechargeable batteries).
When I first pulled the Traynor Travelmates out of the box I was sceptical, but after testing these speakers in the field, I have to say they are easily my favourites. They have a perfect balance of power, portability, and price. At 17.5 lbs they are a little heavy, but the 15w amp does a great job of broadcasting audio to a large area. Additionally, they have a really long battery life–I used them for several days of regular listening/testing before having to recharge the built in battery. The wedge shape gives a lot of options for deployment in the field, and they can be placed on a speaker stand if needed.
I have to admit, I was a little underwhelmed by the Mackie FreePlay Live. Don’t get me wrong, these are great speakers, but they pack a pretty hefty price tag–especially if you’re planning on building a large array with a lot of speakers. They have a lot more dynamic range and low end than the Traynors, but I felt like I had to turn the levels up to 80% or more just to get the sound to carry over a longer distance. I suppose these speakers are designed for buskers who want good quality sound, but aren’t worried about projecting it too far. These speakers look great and are super light (only 9lbs!), but this feels like it comes at the cost of durability. Interestingly, they are the only speakers I looked at that were not recommended to operate below 0° C (which isn’t great for Canadian winters). They come with a speaker stand mount and a mic stand adapter which is a nice bonus.

I am glad that I had the chance to try out these three different speakers, and to be quite honest, I don’t believe it is necessary to have a matched set of speakers for an array of this type. One of the things that makes site-specific work so interesting is being responsive to the surrounding environment, and trying out a variety of different approaches to achieving the desired effect. Having a range of speakers available (some louder, some softer, some larger, some smaller) creates the potential for creating more nuanced interactions between space, sound, and the listener.
With this idea of creating a more nuanced interaction space and sound in mind, the thing I find most exciting about this speaker array is the potential of the LoRa network to make environmentally responsive installation pieces that could use data from environmental sensors (eg. temperature, humidity, barometric pressure) to control or modify playback parameters of pre-recorded tracks (changing playback volume or sample rate, cuing set banks of sounds, or initiating a specific sequence of tracks), or even to control oscillators creating a synthesizer played by nature itself.

I wish to thank the Conseil des Arts et des Lettres du Québec for their generous financial support of this project as part of their Research and Exploration grant program.

